Install Weave GitOps EnterpriseEnterprise
To purchase an entitlement to Weave GitOps Enterprise, please contact sales@weave.works.
Follow the instructions on this page to:
There is no need to install the open source version of Weave GitOps before installing Weave GitOps Enterprise.
Prerequisites
To get up and running with Weave GitOps Enterprise:
- create a Kubernetes cluster
- add your cluster to kubeconfig—which you'll get from Kubernetes—so that the kubeconfig correctly points to the management cluster
- create a Git repository; in the instructions below, we refer to a
fleet-infrarepository - configure your Git client properly (if using GitHub, for example, then review their docs on setting your username and your email address)
- obtain a valid entitlement secret from Weaveworks and apply it to your cluster
- install a compatible version of Flux onto your cluster; see below for how-to guidance
Install the Weave GitOps Enterprise CLI Tool
To do this, you can use either brew or curl.
- Homebrew
- curl
brew install weaveworks/tap/gitops-ee
export VERSION=<VERSION>
curl --silent --location "https://artifacts.wge.dev.weave.works/releases/bin/${VERSION}/gitops-$(uname)-$(uname -m).tar.gz" | tar xz -C /tmp
sudo mv /tmp/gitops /usr/local/bin
gitops version
Install Flux Onto Your Cluster with the flux bootstrap Command
The flux bootstrap command enables you to deploy Flux on a cluster the GitOps way. Go here for more information about the command.
- GitHub
- GitLab
flux bootstrap github \
  --owner=<github username> \
  --repository=fleet-infra \
  --branch=main \
  --path=./clusters/management \
  --personal \
  --components-extra image-reflector-controller,image-automation-controller
flux bootstrap gitlab \
  --owner=<gitlab username> \
  --repository=fleet-infra \
  --branch=main \
  --path=./clusters/management \
  --personal \
  --components-extra image-reflector-controller,image-automation-controller
Your private Git repo should have a clusters/management folder that includes the manifests Flux needs to operate, and that also generates a key value pair for Flux to access the repo.
- owner: The username (or organization) of the Git repository
- repository: Git repository name
- branch: Git branch (default "main")
- path: Path relative to the repository root; when specified, the cluster sync will be scoped to this path
- personal: If set, the owner is assumed to be a repo user
- components-extra: Additional controllers to install
At this point your Flux management cluster should be running. Take a look at the repository you created earlier.
Apply Your Entitlements Secret to Your Cluster
As noted above, you receive your entitlements secret by contacting sales@weave.works. Use this command to apply it to the cluster:
kubectl apply -f entitlements.yaml
Set up Authentication and RBAC
Securing Access to the Dashboard
There are two supported methods for logging in to the dashboard, that work with standard Kubernetes RBAC:
- Login via an OIDC provider: recommended, as this will allow you to control permissions for existing users and groups that have already been configured to use OIDC. OIDC decouples the need to manage user lists from the application, allowing it to be managed via a central system designed for that purpose (i.e. the OIDC provider). OIDC also enables the creation of groups—either via your provider's own systems or by using a connector like Dex.
- Login via a cluster user account: which is insecure, and which we only recommend for local and development environments or if you need to activate emergency access to a damaged cluster. However, it is an option if an OIDC provider is not available.
You may decide to give your engineering teams access to the WGE dashboard so they can view and manage their workloads. In this case, you will want to secure dashboard access and restrict who can interact with it. Weave GitOps Enterprise integrates with your OIDC provider and uses standard Kubernetes RBAC to give you fine-grained control of the dashboard users' permissions.
OIDC extends the OAuth2 authorization protocol by including an additional field (ID Token) that contains information (claims) about a user's identity. After a user successfully authenticates with the OIDC provider, Weave GitOps Enterprise uses this information to impersonate the user in any calls to the Kubernetes API. This allows cluster administrators to use RBAC rules to control access to the cluster and the dashboard.
- Login via an OIDC provider
- Configuring OIDC with Dex and GitHub
- Login via a cluster user account
To login via your OIDC provider, create a Kubernetes secret to store the OIDC configuration. This configuration consists of the following parameters:
| Parameter | Description | Default |
|---|---|---|
issuerURL | The URL of the issuer; typically, the discovery URL without a path | |
clientID | The client ID set up for Weave GitOps in the issuer | |
clientSecret | The client secret set up for Weave GitOps in the issuer | |
redirectURL | The redirect URL set up for Weave GitOps in the issuer—typically the dashboard URL, followed by /oauth2/callback | |
tokenDuration | The time duration that the ID Token will remain valid after successful authentication | "1h0m0s" |
tokenDuration | The time duration that the ID Token will remain valid after successful authentication | "1h0m0s" |
oidcUsernamePrefix | The prefix added to users when impersonating API calls to the Kubernetes API, equivalent to --oidc-username-prefix | |
oidcGroupsPrefix | The prefix added to groups when impersonating API calls to the Kubernetes API, equivalent to --oidc-groups-prefix |
Ensure that your OIDC provider has been set up with a client ID/secret and the dashboard's redirect URL.
Create a secret named oidc-auth in the flux-system namespace with these parameters set:
kubectl create secret generic oidc-auth \
  --namespace flux-system \
  --from-literal=issuerURL=<oidc-issuer-url> \
  --from-literal=clientID=<client-id> \
  --from-literal=clientSecret=<client-secret> \
  --from-literal=redirectURL=<redirect-url> \
  --from-literal=tokenDuration=<token-duration>
Once the HTTP server starts, unauthenticated users will have to click 'Login With OIDC Provider' to log in or use the cluster account (if configured). Upon successful authentication, the users' identities will be impersonated in any calls made to the Kubernetes API, as part of any action they take in the dashboard. By default the Helm chart will configure RBAC correctly, but we recommend reading the service account and user permissions pages to understand which actions are needed for Weave GitOps to function correctly.
Customization
For some OIDC configurations, you may need to customise the requested scopes or claims.
The oidcUsernamePrefix and oidcGroupsPrefix work in the same way as the Kubernetes kube-apiserver command-line options, if you need them for Kubernetes, you will likely need them here.
Scopes
By default, the following scopes are requested: "openid","offline_access","email","groups".
The "openid" scope is mandatory for OpenID auth and will be added if not provided. The "email" and "groups" scopes are commonly used as unique identifiers in organisations.
"offline_access" allows us to refresh OIDC tokens to keep login sessions alive for as long as a refresh token is valid. You can, however, change the defaults.
kubectl create secret generic oidc-auth \
  --namespace flux-system \
  --from-literal=issuerURL=<oidc-issuer-url> \
  --from-literal=clientID=<client-id> \
  --from-literal=clientSecret=<client-secret> \
  --from-literal=redirectURL=<redirect-url> \
  --from-literal=tokenDuration=<token-duration> \
  --from-literal=customScopes=custom,scopes
The format for the customScopes key is a comma-separated list of scopes to request. In this case, "custom", "scopes", and "openid" would be requested.
Claims
By default, the following claims are parsed from the OpenID ID Token "email" and "groups". These are presented as the user and groups when WGE communicates with your Kubernetes API server.
This is equivalent to configuring your kube-apiserver with --oidc-username-claim=email --oidc-groups-claim=groups.
Again, you can configure these from the oidc-auth Secret.
kubectl create secret generic oidc-auth \
  --namespace flux-system \
  --from-literal=issuerURL=<oidc-issuer-url> \
  --from-literal=clientID=<client-id> \
  --from-literal=clientSecret=<client-secret> \
  --from-literal=redirectURL=<redirect-url> \
  --from-literal=tokenDuration=<token-duration> \
  --from-literal=claimUsername=sub \
  --from-literal=claimGroups=groups
There are two separate configuration keys. You can override them separately. They should match your kube-apiserver configuration.
Configuring OIDC with Dex and GitHub
This example uses Dex and its GitHub connector to show you how to log in to the Weave GitOps dashboard by authenticating with your GitHub account. It assumes you have already installed Weave GitOps on a Kubernetes cluster, per the instructions above, and have also enabled TLS.
Dex is an identity service that uses OpenID Connect to drive authentication for other apps. There are other solutions for identity and access management, such as Keycloak.
Create a namespace where you will install Dex:
---
apiVersion: v1
kind: Namespace
metadata:
  name: dex
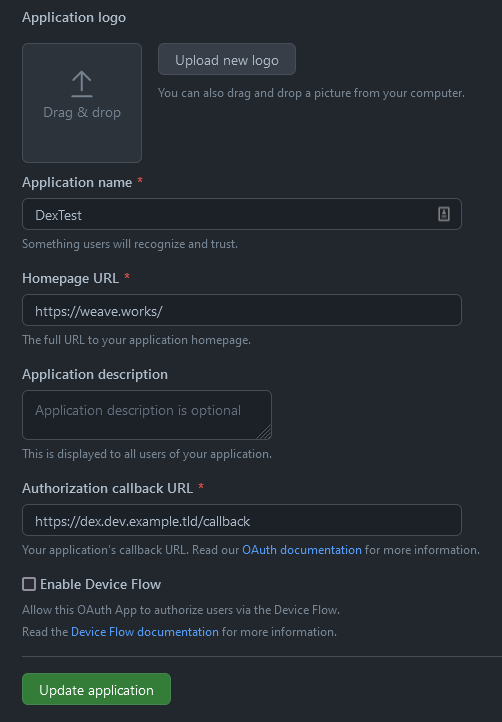
Get a GitHub ClientID and Client secret by creating a new OAuth application.
kubectl create secret generic github-client \
  --namespace=dex \
  --from-literal=client-id=${GITHUB_CLIENT_ID} \
  --from-literal=client-secret=${GITHUB_CLIENT_SECRET}
Deploy Dex
Use HelmRepository and HelmRelease objects to let Flux deploy everything.
Expand to see resource manifests
An important part of the configuration is the orgs field on the GitHub
connector, which allows you to define groups within a GitHub organisation:
orgs:
- name: weaveworks
  teams:
  - team-a
  - team-b
  - QA
In this example, the GitHub organisation is weaveworks and all members of the team-a,
team-b, and QA teams can authenticate. Group membership is added to
the user.
Based on these groups, we can bind roles to groups:
Expand to see group role bindings
In the same way, we can bind cluster roles to a group:
Expand to see group cluster role bindings
Set up a Static User
For a static user, add staticPasswords to the config:
spec:
  values:
    config:
      staticPasswords:
      - email: "admin@example.tld"
        hash: "$2a$10$2b2cU8CPhOTaGrs1HRQuAueS7JTT5ZHsHSzYiFPm1leZck7Mc8T4W"
        username: "admin"
        userID: "08a8684b-db88-4b73-90a9-3cd1661f5466"
Generate a static user password via the gitops CLI:
PASSWORD="<your password>"
echo -n $PASSWORD | gitops get bcrypt-hash
$2a$10$OS5NJmPNEb13UgTOSKnMxOWlmS7mlxX77hv4yAiISvZ71Dc7IuN3q
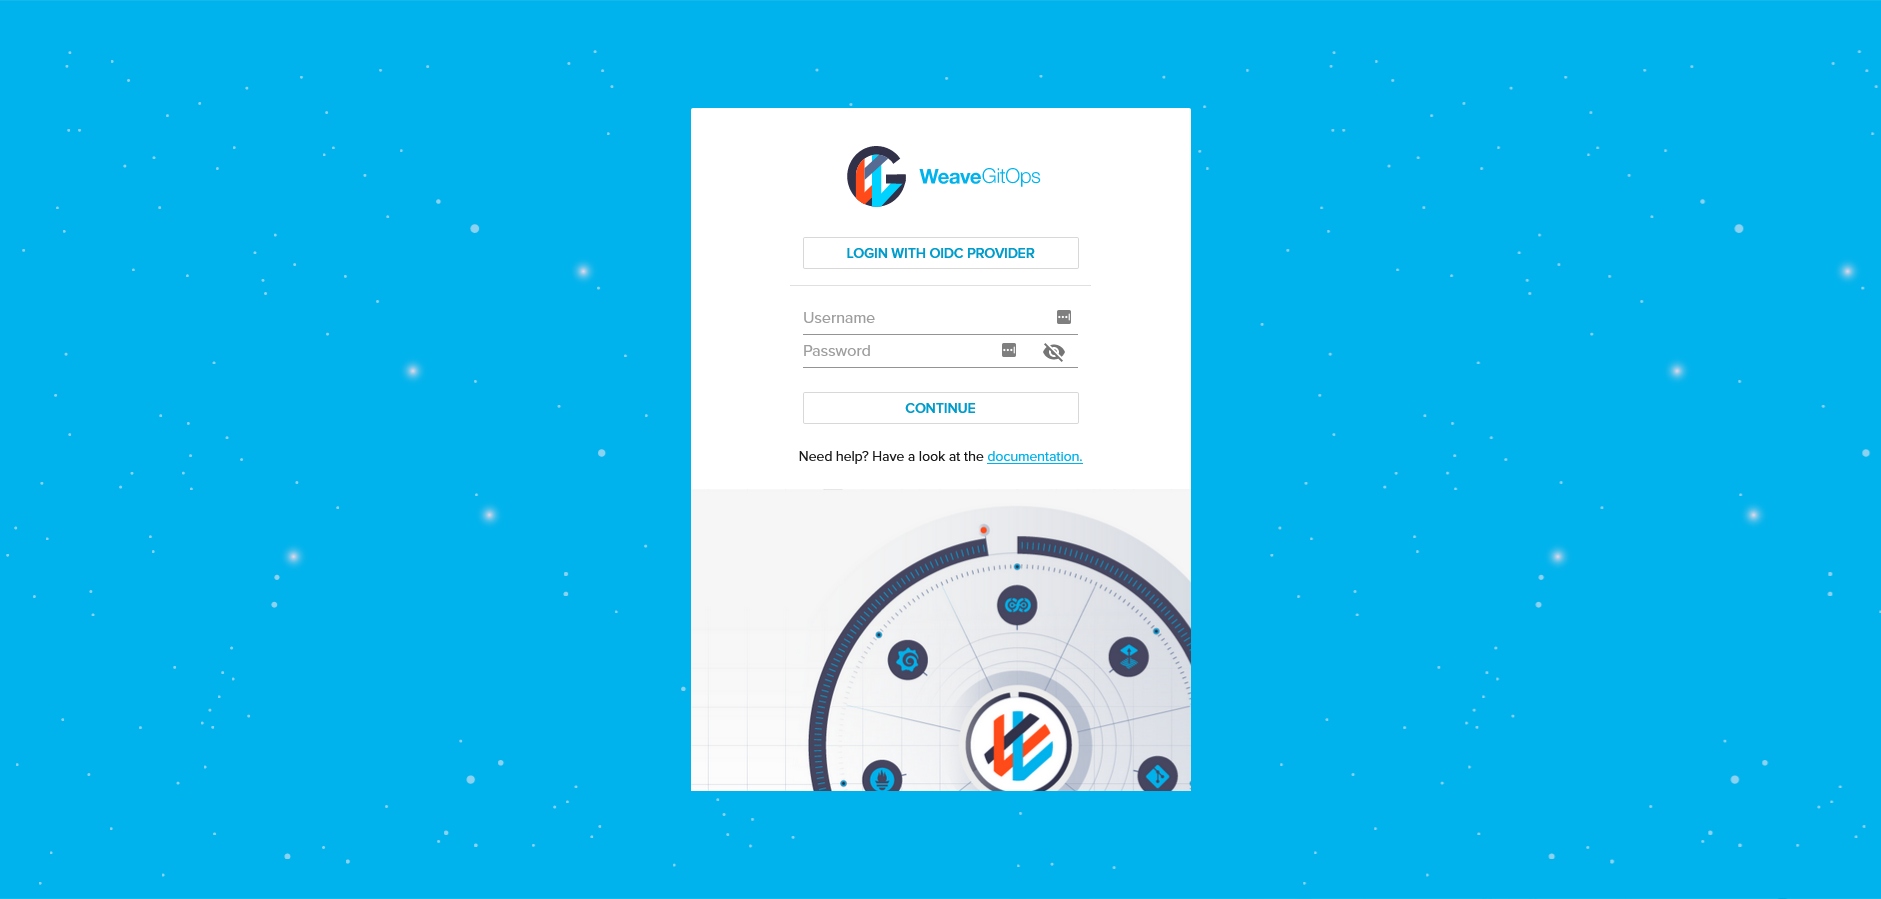
OIDC Login
Using the "Login with OIDC Provider" button:
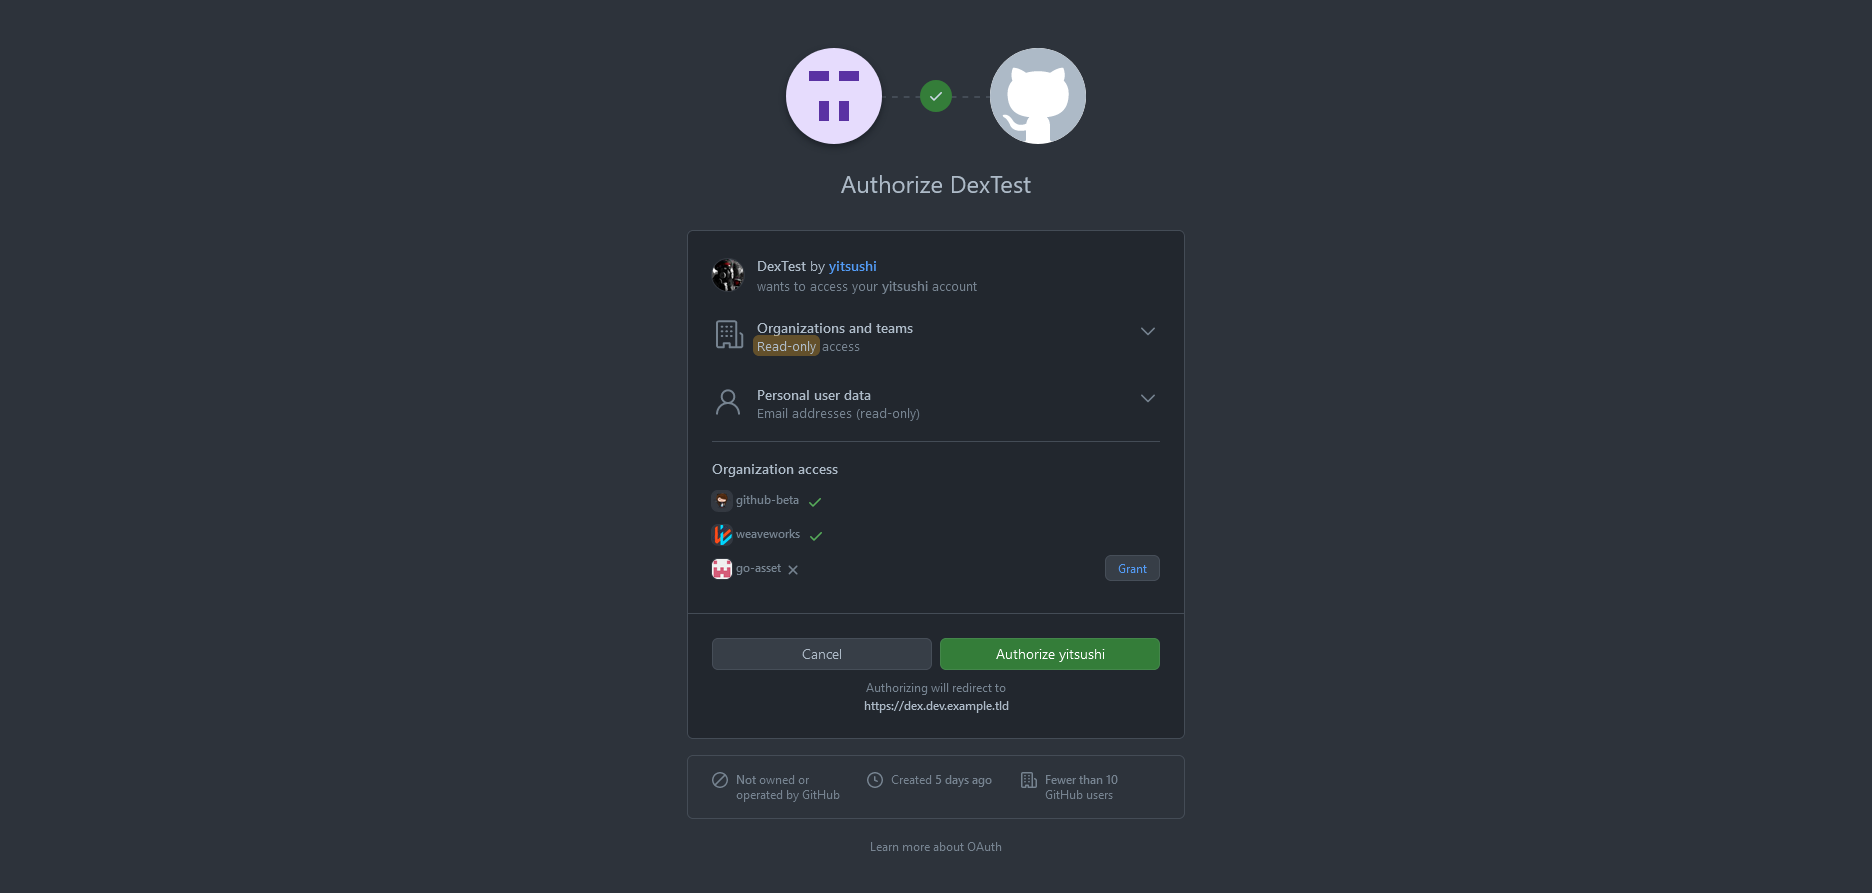
We have to authorize the GitHub OAuth application:
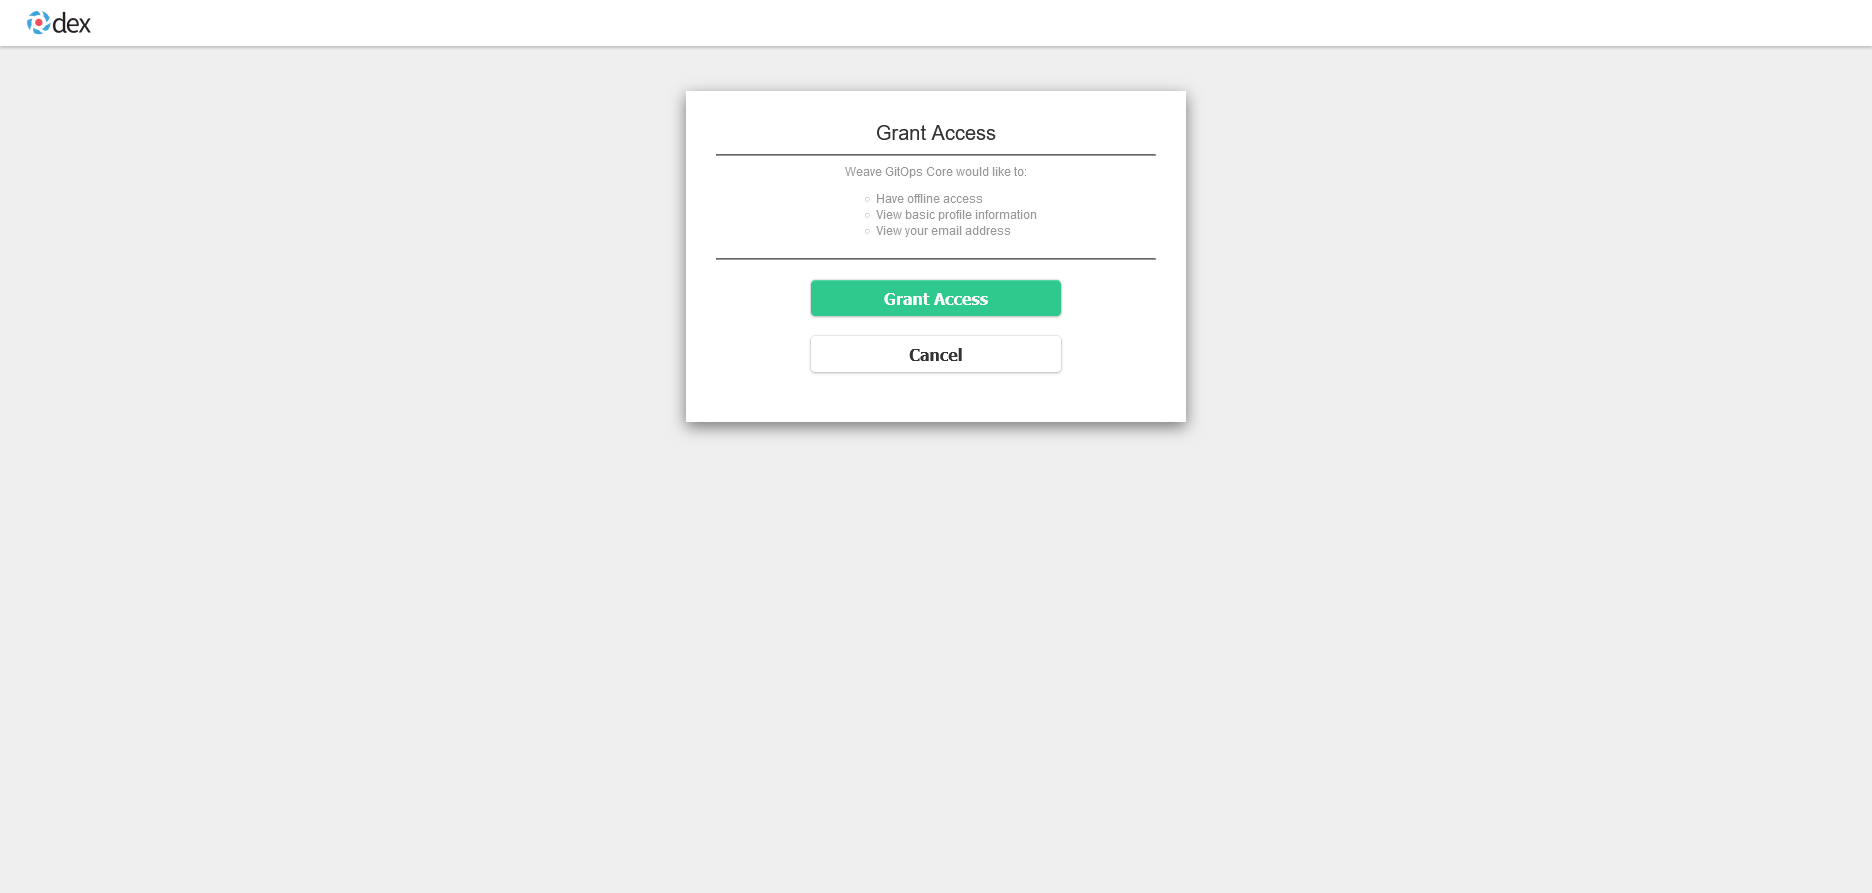
After that, grant access to Dex:
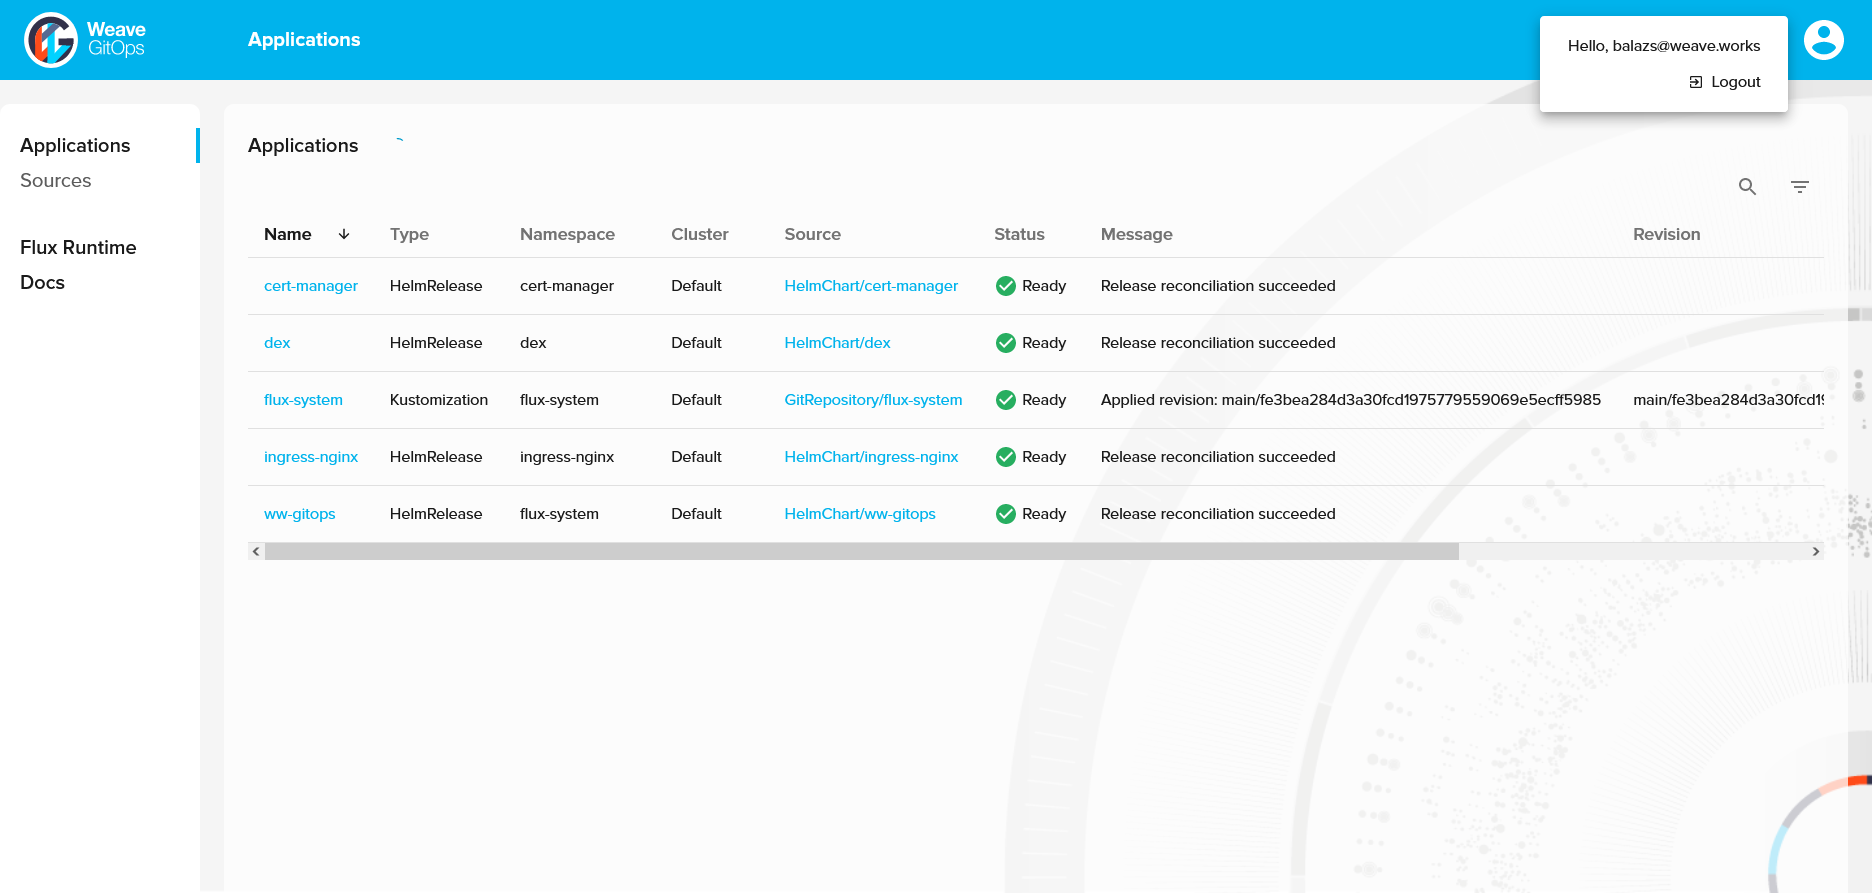
Now we are logged in with our GitHub user and can see all of the resources we have access to:
This is an insecure method of securing your dashboard which we only recommend for local and development environments, or if you need to activate emergency access to a damaged cluster.
Note also that this mechanism only exists for a single user. You will not be able to create multiple users. Weave GitOps does not provide its own authentication mechanism. For secure and fully-featured authentication we strongly recommend using an OIDC provider, as described in the other tab.
Configuring the Emergency User
Before you log in via the emergency user account, you need to generate a bcrypt hash for your chosen password and store it as a secret in Kubernetes. There are several different ways to generate a bcrypt hash. This guide uses gitops get bcrypt-hash from our CLI.
Generate the password by running:
PASSWORD="<your password>"
echo -n $PASSWORD | gitops get bcrypt-hash
$2a$10$OS5NJmPNEb13UgTOSKnMxOWlmS7mlxX77hv4yAiISvZ71Dc7IuN3q
Now create a Kubernetes secret to store your chosen username and the password hash:
kubectl create secret generic cluster-user-auth \
  --namespace flux-system \
  --from-literal=username=wego-admin \
  --from-literal=password='$2a$10$OS5NJmPNEb13UTOSKngMxOWlmS7mlxX77hv4yAiISvZ71Dc7IuN3q'
You should now be able to login via the cluster user account using your chosen username and password.
Updating the Emergency User
To change either the username or the password, recreate the cluster-user-auth
with the new details.
Only one emergency user can be created this way. To add more users, enable an OIDC provider.
User Permissions
By default, both a ClusterRole and Role are generated for the emergency user.
Both have the same permissions, with the former being optional and the latter being
bound to the flux-system namespace (where Flux stores its resources by default).
The default set of rules are configured like this:
rules:
  # Flux Resources
  - apiGroups: ["source.toolkit.fluxcd.io"]
    resources: [ "buckets", "helmcharts", "gitrepositories", "helmrepositories", "ocirepositories" ]
    verbs: [ "get", "list", "watch", "patch" ]

  - apiGroups: ["kustomize.toolkit.fluxcd.io"]
    resources: [ "kustomizations" ]
    verbs: [ "get", "list", "watch", "patch" ]

  - apiGroups: ["helm.toolkit.fluxcd.io"]
    resources: [ "helmreleases" ]
    verbs: [ "get", "list", "watch", "patch" ]

  - apiGroups: [ "notification.toolkit.fluxcd.io" ]
    resources: [ "providers", "alerts" ]
    verbs: [ "get", "list", "watch", "patch" ]

  - apiGroups: ["infra.contrib.fluxcd.io"]
    resources: ["terraforms"]
    verbs: [ "get", "list", "watch", "patch" ]

  # Read access for all other Kubernetes objects
  - apiGroups: ["*"]
    resources: ["*"]
    verbs: [ "get", "list", "watch" ]
These permissions give the emergency user Administrator-level powers. We do not advise leaving it active on production systems.
If required, the permissions can be expanded with the rbac.additionalRules field in the
Helm Chart.
Follow the instructions in the next section in order to configure RBAC correctly.
To remove the emergency user as a login method, set the following values in the Helm Chart:
#
adminUser:
  create: false
#
additionalArgs:
- --auth-methods=oidc
#
If you are disabling an already existing emergency user, you will need to manually delete the Kubernetes Secret and any User Roles that were created on the cluster.
GitOps Dashboard Service Account Permissions
This section covers the service account permissions for the Weave GitOps application, which the WGE UI requires to work. The default permissions will generate a cluster role that includes the permissions:
rules:
- apiGroups: [""]
  resources:  ["users", "groups"]
  verbs: [ "impersonate" ]
- apiGroups: [""]
  resources: [ "secrets" ]
  verbs: [ "get", "list" ]
- apiGroups: [ "" ]
  resources: [ "namespaces" ]
  verbs: [ "get", "list" ]
These allow the pod to do three things:
- Impersonate the user and operate in the cluster as them
- Read the available namespaces; this is required to understand users' permissions
- Read the
cluster-user-authandoidc-authsecrets, the default secrets to store the emergency cluster user account and OIDC configuration (see securing access to the dashboard)
Impersonation
The primary way Weave GitOps queries the Kube API is via impersonation. The permissions granted to users and groups that Weave GitOps
can impersonate will determine the scope of actions that WGE can take within your cluster.
The application, not the cluster, authenticates the user, either via the emergency cluster user credentials or OIDC. Then it makes Kube API calls on the user's behalf. This is equivalent to making a kubectl call like:
$ kubectl get deployments --as aisha@example.com
Assuming the user aisha@example.com has permissions to get
deployments within the cluster, this will return those deployments. The same occurs
within the application, so properly configuring application
permissions is very important. Without proper restrictions the application can impersonate
very powerful users or groups. For example, the system:masters is a group
generally bound to the cluster-admin role, which can do anything.
Get Namespaces
The application itself uses get namespace permissions to pre-cache the list of available namespaces. As the user accesses resources their permissions within various namespaces is also cached to speed up future operations.
Reading the cluster-user-auth and oidc-auth Secrets
The cluster-user-auth and oidc-auth secrets provide information for authenticating
to the application. The former holds the username and bcrypt-hashed password
for the emergency user, and the latter holds OIDC configuration.
The application needs to be able to access these secrets in order to authenticate users.
User Permissions
This section discusses the Kubernetes permissions
needed by Weave GitOps application users and groups. At a minimum, a User should be bound to a Role in the flux-system namespace—which is where
Flux stores its resources by default—with the following permissions:
rules:
  # Flux Resources
  - apiGroups: ["source.toolkit.fluxcd.io"]
    resources: [ "buckets", "helmcharts", "gitrepositories", "helmrepositories", "ocirepositories" ]
    verbs: [ "get", "list", "watch", "patch" ]

  - apiGroups: ["kustomize.toolkit.fluxcd.io"]
    resources: [ "kustomizations" ]
    verbs: [ "get", "list", "watch", "patch" ]

  - apiGroups: ["helm.toolkit.fluxcd.io"]
    resources: [ "helmreleases" ]
    verbs: [ "get", "list", "watch", "patch" ]

  - apiGroups: [ "notification.toolkit.fluxcd.io" ]
    resources: [ "providers", "alerts" ]
    verbs: [ "get", "list", "watch", "patch" ]

  - apiGroups: ["infra.contrib.fluxcd.io"]
    resources: ["terraforms"]
    verbs: [ "get", "list", "watch", "patch" ]

  # Read access for all other Kubernetes objects
  - apiGroups: ["*"]
    resources: ["*"]
    verbs: [ "get", "list", "watch" ]
For a wider scope, the User can be bound to a ClusterRole with the same set.
On top of this you can add other permissions to view WGE resources like GitOpsSets and Templates.
Flux Resources
The following table lists resources that Flux works with directly.
| API Group | Resources | Permissions |
|---|---|---|
| kustomize.toolkit.fluxcd.io | kustomizations | get, list, patch |
| helm.toolkit.fluxcd.io | Helm Releases | get, list, patch |
| source.toolkit.fluxcd.io | buckets, Helm charts, Git repositories, Helm repositories, OCI repositories | get, list, patch |
| notification.toolkit.fluxcd.io | providers, alerts | get, list |
| infra.contrib.fluxcd.io | Terraform | get, list, patch |
Weave GitOps needs to be able to query the CRDs that Flux uses before it can accurately display Flux state. The
get and list permissions facilitate this.
The patch permissions are used for two features: to suspend and resume
reconciliation of a resource by modifying the 'spec' of a resource,
and to force reconciliation of a resource by modifying resource annotations. These features work in the same way that flux suspend,
flux resume, and flux reconcile does on the CLI.
Resources Managed via Flux
| API Group | Resources | Permissions |
|---|---|---|
| "" | configmaps, secrets, pods, services, persistent volumes, persistent volume claims | get, list, watch |
| apps | deployments, replica sets, stateful sets | get, list, watch |
| batch | jobs, cron jobs | get, list, watch |
| autoscaling | horizontal pod autoscalers | get, list, watch |
| rbac.authorization.k8s.io | roles, cluster roles, rolebindings, cluster role bindings | get, list, watch |
| networking.k8s.io | ingresses | get, list, watch |
Weave GitOps reads basic resources so that it can monitor the effect that Flux has on what's running.
Reading secrets enables Weave GitOps to monitor the state of Helm releases
as that's where it stores the state by default.
For clarity this these are the Helm release objects not the Flux HelmRelease
resource (which are dealt with by the earlier section).
Feedback from Flux
Flux communicates the status of itself primarily via events. These events will show when reconciliations start and stop, whether they're successful, and information as to why they're not.
Login UI
The label of the OIDC button on the login screen is configurable via a feature flag environment variable. This can give your users a more familiar experience when logging in.
Adjust the configuration in the Helm values.yaml file or the spec.values section of the Weave GitOps HelmRelease resource:
extraEnvVars:
  - name: WEAVE_GITOPS_FEATURE_OIDC_BUTTON_LABEL
    value: "Login with ACME"
Recommended RBAC Configuration
This section is purposefully vague as we intend to give a broad idea of how to implement such a system. The specifics will dependent on your circumstances and goals.
Our general recommendation is to use OIDC and a small number of groups that Weave GitOps can impersonate.
Configuring Weave GitOps to impersonate Kubernetes groups rather than users has the following benefits:
- A user's permissions for impersonation by Weave GitOps can be separate from any other permissions that they may or may not have within the cluster.
- Users do not have to be individually managed within the cluster and can have their permissions managed together.
Example Setup
Assume that your company has the following people in OIDC:
- Aisha, a cluster admin, who should have full admin access to Weave GitOps
- Brian, lead of Team-A, who should have admin permissions to their team's namespace in Weave GitOps and read-only otherwise
- June and Jo, developers in Team-A who should have read-only access to Weave GitOps
You can then create three groups:
wego-admin- Bound to the
ClusterRole, created by Helm,wego-admin-cluster-role - Aisha is the only member
- Bound to the
wego-team-a-admin- Bound to a
Role, using the same permissions aswego-admin-role, created in Team-A's namespace - Brian and Aisha are members
- Bound to a
wego-readonly- Bound to a
ClusterRolethat matcheswego-admin-cluster-rolebut with nopatchpermissions. - Aisha, Brian, June and Jo are all members
- Bound to a
If the same OIDC provider is used to authenticate a user with the cluster
itself (e.g. for use with kubectl) and to Weave GitOps then, depending
on OIDC configuration, they may end up with the super-set of their permissions
from Weave GitOps and any other permissions granted to them.
This can lead to unintended consequences, like viewing secrets. To avoid
this, OIDC providers will often let you configure which groups are returned
to which clients. The Weave GitOps groups should not be returned to the
cluster client (and vice versa).
Code
The yaml to configure these permissions would look roughly like:
Expand to see example RBAC
Configure Access for Writing to Git from the Weave GitOps Enterprise UI
Here we provide guidance for GitHub, GitLab, BitBucket Server, and Azure DevOps.
- GitHub
- GitLab
- BitBucket Server
- Azure DevOps
Create a GitLab OAuth application that will request api permissions to create pull requests on your behalf.
Follow the GitLab docs.
The application should have at least these scopes:
apiopenidemailprofile
Add callback URLs to the application for each address the UI will be exposed on, e.g.:
https://localhost:8000/oauth/gitlabfor port-forwarding and testinghttps://git.example.com/oauth/gitlabfor production use
Save your application, taking note of the Client ID and Client Secret. Save
them into the git-provider-credentials secret, along with:
GIT_HOST_TYPESto tell WGE that the host is gitlabGITLAB_HOSTNAMEwhere the OAuth app is hosted
Replace values in this snippet and run:
kubectl create secret generic git-provider-credentials --namespace=flux-system \
  --from-literal="GITLAB_CLIENT_ID=13457" \
  --from-literal="GITLAB_CLIENT_SECRET=24680" \
  --from-literal="GITLAB_HOSTNAME=git.example.com" \
  --from-literal="GIT_HOST_TYPES=git.example.com=gitlab"
Create a new incoming application link from
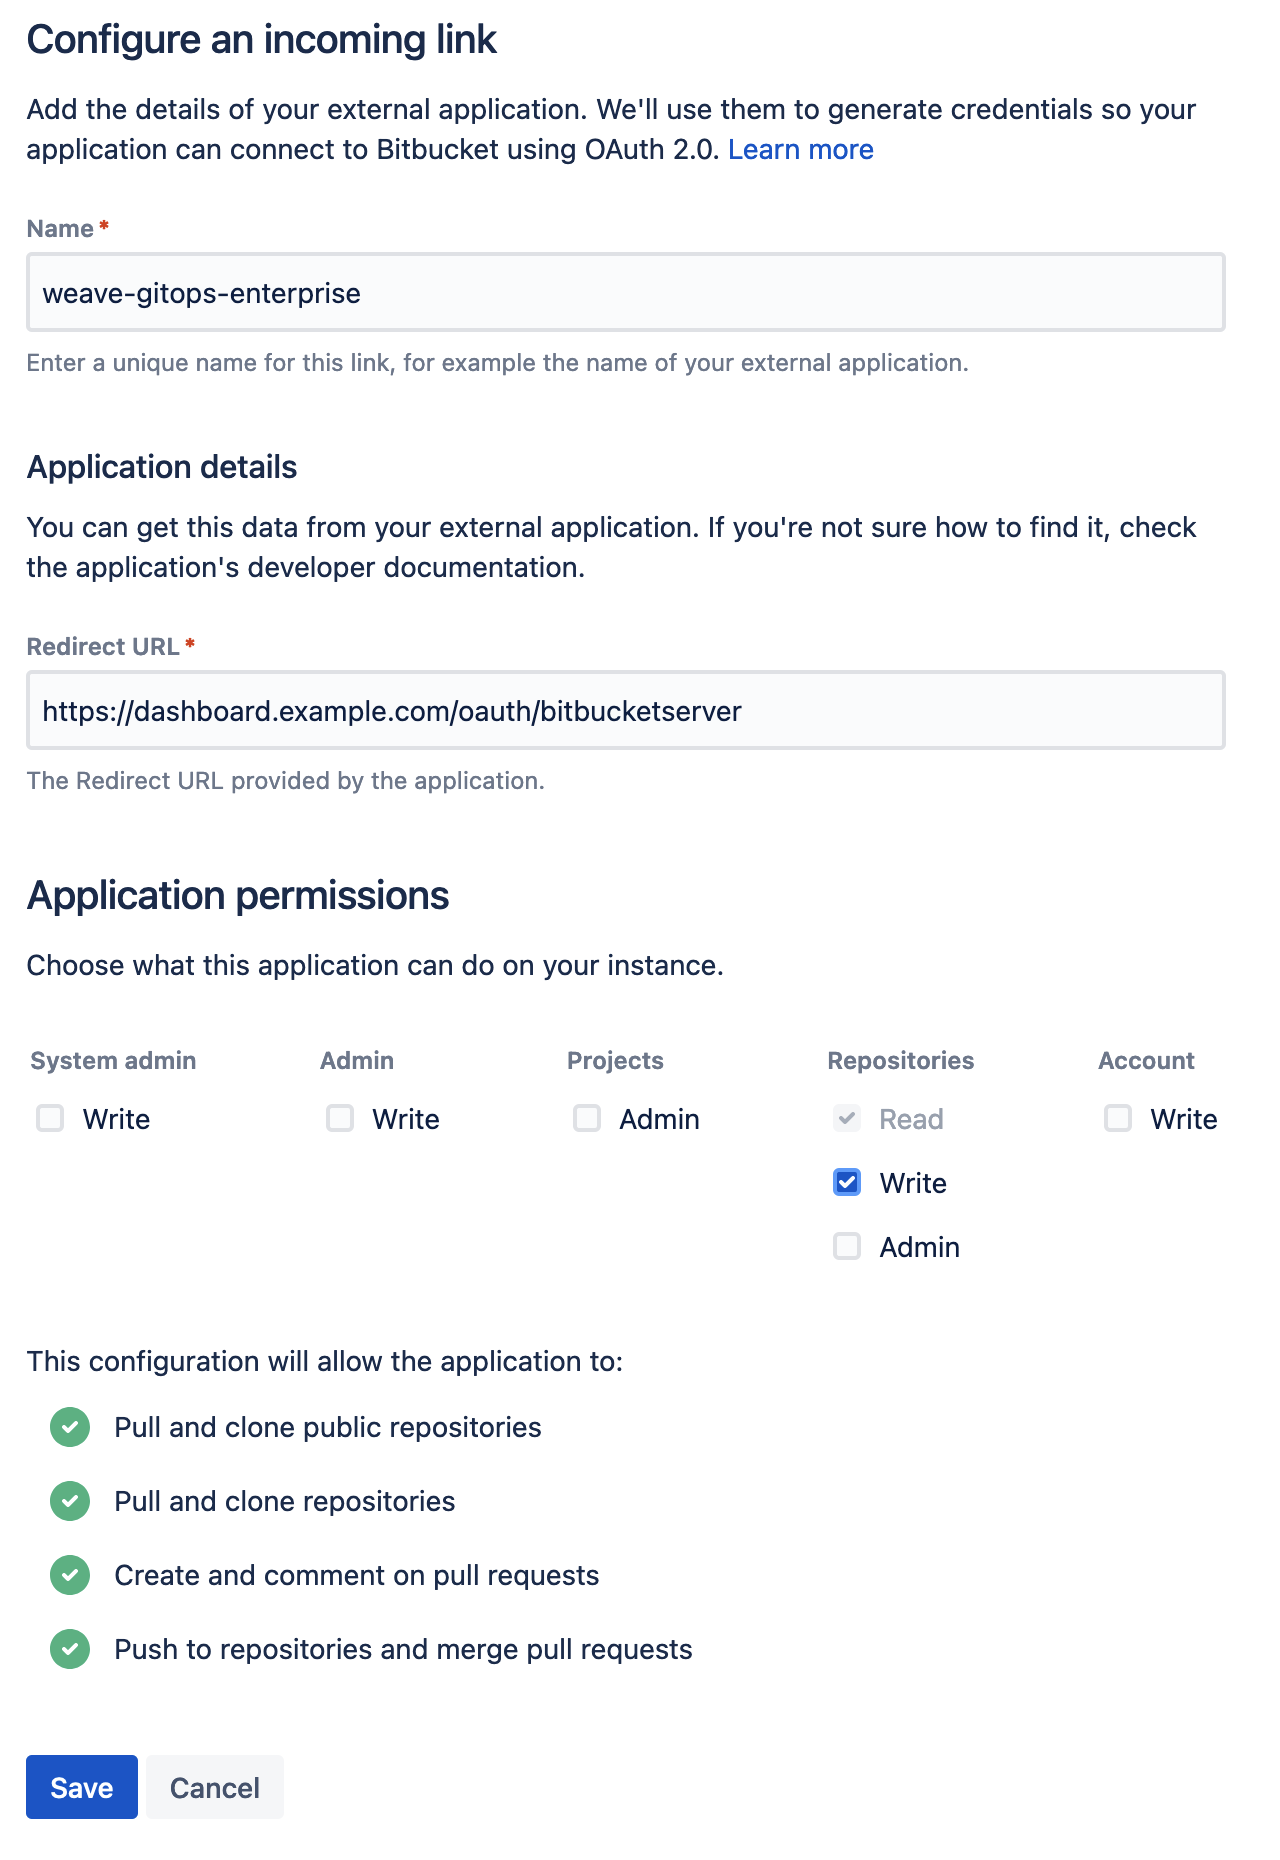
the BitBucket administration dashboard. You will be asked to enter a unique name and the redirect URL for the external application. The redirect URL
should be set to <WGE dashboard URL>/oauth/bitbucketserver. You will also need to select permissions for the application. The minimum set of
permissions needed for WGE to create pull requests on behalf of users is Repositories - Write. An example of configuring these settings is shown below.
Save your application and take note of the Client ID and Client Secret. Save
them into the git-provider-credentials secret, along with:
GIT_HOST_TYPESto tell WGE that the host is bitbucket-serverBITBUCKET_SERVER_HOSTNAMEwhere the OAuth app is hosted
Replace values in this snippet and run:
kubectl create secret generic git-provider-credentials --namespace=flux-system \
  --from-literal="BITBUCKET_SERVER_CLIENT_ID=13457" \
  --from-literal="BITBUCKET_SERVER_CLIENT_SECRET=24680" \
  --from-literal="BITBUCKET_SERVER_HOSTNAME=git.example.com" \
  --from-literal="GIT_HOST_TYPES=git.example.com=bitbucket-server"
If the secret is already present, use the following command to update it using your default editor:
kubectl edit secret generic git-provider-credentials --namespace=flux-system
If BitBucket Server is running on the default port (7990), make sure you include the port number in the values of the secret. For example: GIT_HOST_TYPES=git.example.com:7990=bitbucket-server
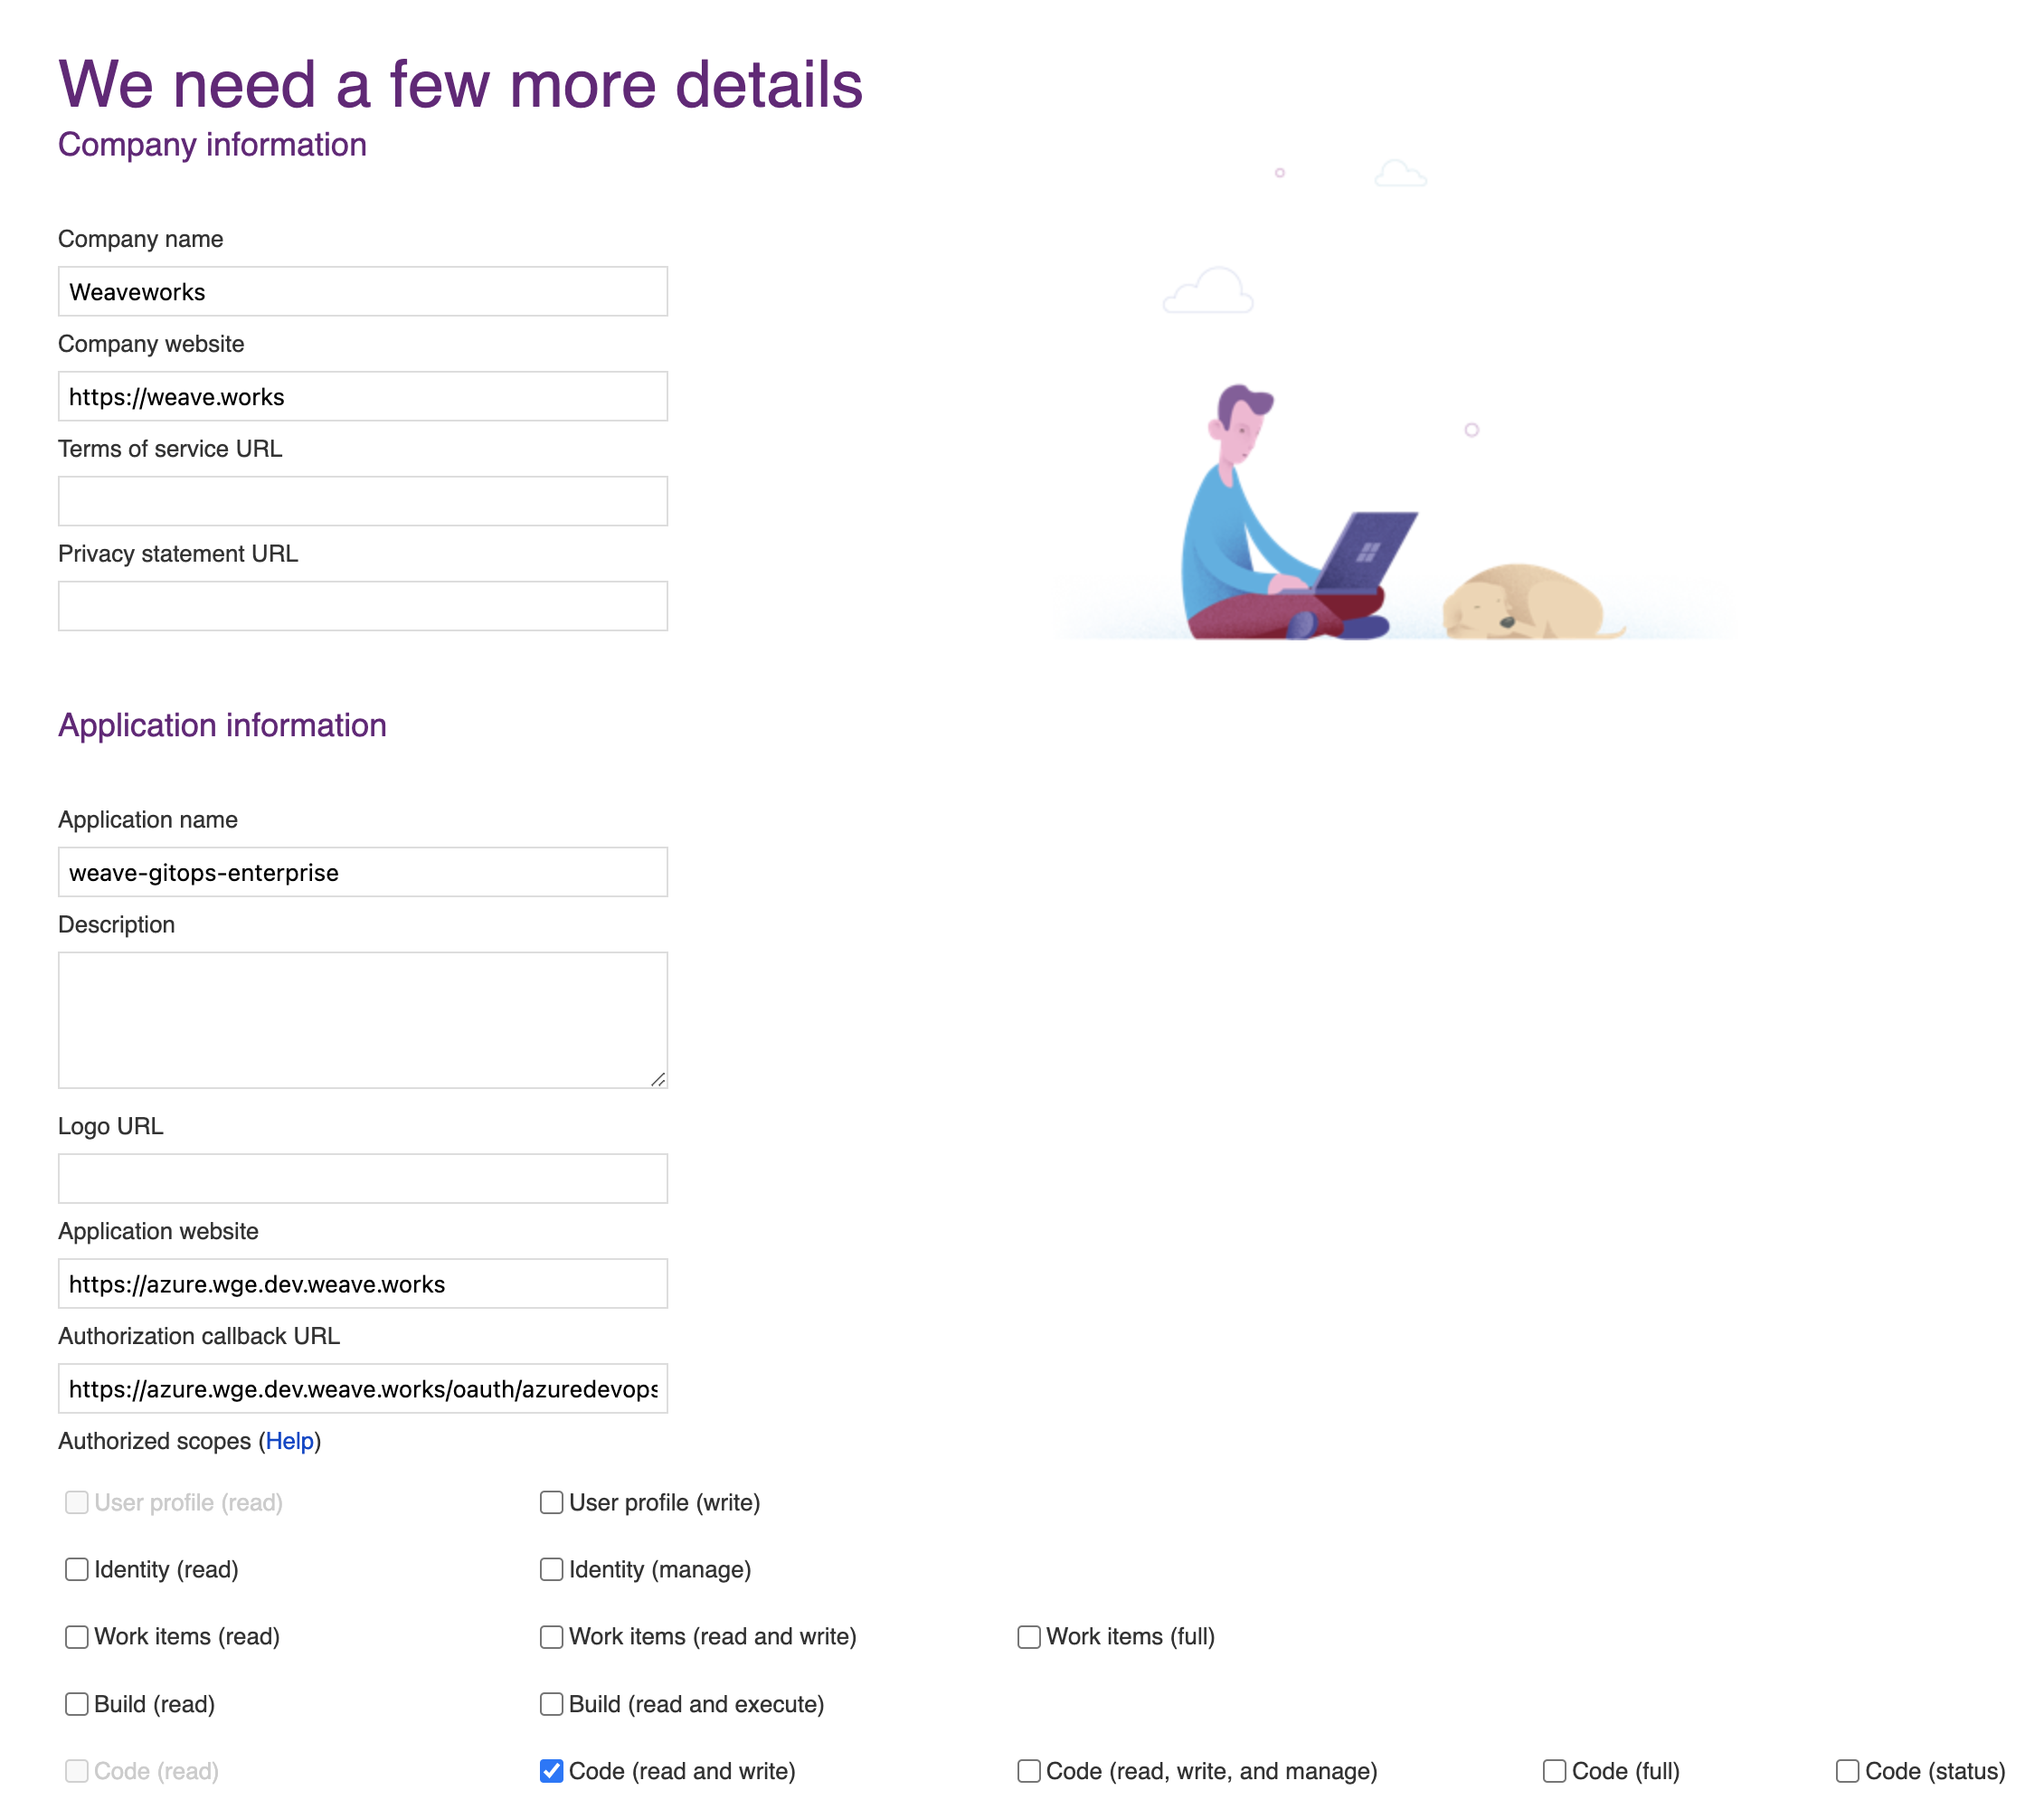
Navigate to VisualStudio and register a new application, as explained in the docs. Set the authorization callback URL and select which scopes to grant. Set the callback URL to <WGE dashboard URL>/oauth/azuredevops.
Select the Code (read and write) scope from the list. This is necessary so that WGE can create pull requests on behalf of users. An example of configuring these settings is shown below.
After creating your application, you will be presented with the application settings. Take note of the App ID and Client Secret values—you will use them to configure WGE.
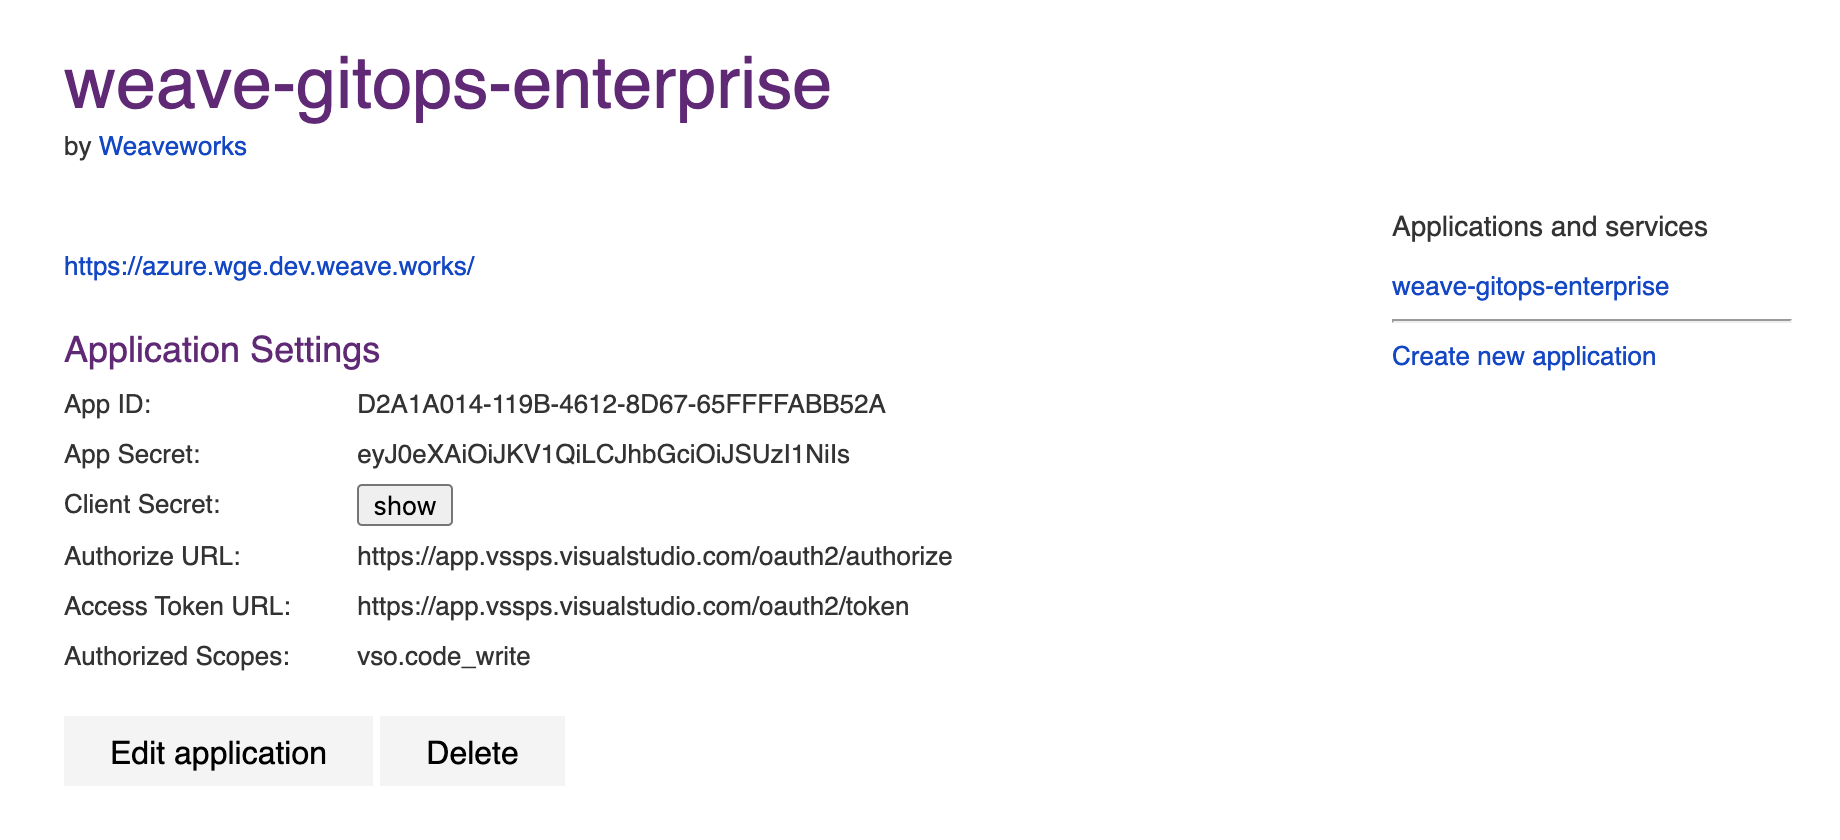
In your cluster, create a secret named git-provider-credentials that contains the App ID and Client Secret values from the newly created application.
Replace values in this snippet and run:
kubectl create secret generic git-provider-credentials --namespace=flux-system \
  --from-literal="AZURE_DEVOPS_CLIENT_ID=<App ID value>" \
  --from-literal="AZURE_DEVOPS_CLIENT_SECRET=<Client Secret value>"
WGE is now configured to ask users for authorization the next time a pull request must be created as part of using a template. Note that each user can view and manage which applications they have authorized by navigating to https://app.vsaex.visualstudio.com/me.
TLS Configuration
By default, the WGE UI pod will listen on port 8000 with TLS enabled.
WGE will generate and use a self-signed certificate for this purpose.
It can then be accessed via port-forwarding:
kubectl port-forward --namespace flux-system svc/clusters-service 8000:8000
If you're using an ingress controller to terminate TLS you can disable it in the Helm release:
  values:
    tls:
      enabled: false
Other ingress conguration changes can be made via the ingress configuration
  values:
    ingress:
      enabled: true
      ... other parameters specific to the ingress type ...
Configure Helm Chart and Commit
We deploy WGE via a Helm chart. We'll save and adapt the below template before committing it in Git to a Flux-reconciled path.
Clone the newly created repo locally. We're gonna add some things!
git clone git@<provider>:<username>/fleet-infra
cd fleet-infra
Download the helm-release to clusters/management/weave-gitops-enterprise.yaml.
Expand to see file contents
Once you have copied the above file, open and adjust the following configuration options:
values.config.capi.repositoryURL
Ensure this has been set to your repository URL.
values.config.capi.repositoryPath
By default, WGE will create new clusters in the clusters/management/clusters path.
You can configure it with values.config.capi.repositoryPath.
You might what to change it to clusters/my-cluster/cluster if you configured Flux to reconcile ./clusters/my-cluster instead.
values.config.capi.repositoryClustersPath
The other important path to configure is where you'll store applications and workloads run on the new cluster.
By default this is ./clusters. When a new cluster is specified, any selected profiles will be written to ./clusters/{.namespace}/{.clusterName}/profiles.yaml.
When the new cluster is bootstrapped, Flux will sync the ./clusters/{.namespace}/{.clusterName} path.
Configure Your Password
To login to the WGE UI, generate a bcrypt hash for your chosen password and store it as a secret in the Kubernetes cluster. There are several different ways to generate a bcrypt hash. Here, we'll use gitops get bcrypt-hash from our CLI.
PASSWORD="<Make up and insert a brand-new password here>"
echo -n $PASSWORD | gitops get bcrypt-hash | kubectl create secret generic cluster-user-auth -n flux-system --from-literal=username=wego-admin --from-file=password=/dev/stdin
A validation to know it’s working:
kubectl get secret -n flux-system cluster-user-auth
(Optional) Install Policy Agent
Policy agent comes packaged with the WGE chart. To install it, set the following values:
values.policy-agent.enabled: set to true to install the agent with WGEvalues.policy-agent.config.accountId: organization name, used as identifiervalues.policy-agent.config.clusterId: unique identifier for the cluster
Commit and push all the files
git add clusters/management/weave-gitops-enterprise.yaml
git commit -m "Deploy Weave GitOps Enterprise"
git push
Flux will reconcile the helm-release and WGE will be deployed into the cluster. You can check the flux-system namespace to verify all pods are running.
Next Steps
Here are a couple of options for you to take your next steps with WGE. Explore one option or all of them, in no particular order.
- Cluster Management: We'll show you how to join WGE to a cluster and install an application on that cluster without using Cluster API. But if you prefer using Cluster API, our docs cover that too.
- Install the Terraform Controller to reconcile your Terraform resources in a GitOps way. With Flux and the TF Controller, WGE makes it easy to add Terraform templates to your clusters and continuously reconcile any changes made to the Terraform source manifest.
- Install Policy agent, which comes packaged with the WGE chart.